
|
READING
DREDGE TAILS: Published in the Mar/Apr 2000
issue
of GPAA
Magazine One of the
questions I hear most from prospectors is
“What about those tails from the bucket line dredge over on XXX
Creek? How do I test and mine them?”
I have been on working bucket line dredges, and tested their
tails in several states, and mined behind one in Nevada. And the simple
answer is, “It depends…” If you are interested in dredge tails, there are several
things you need to know before you get too involved in testing or even
mining behind a bucket dredge. The first thing to ask is: what kind of
bucket dredge was it? How long was it from boom to the end of the
conveyor? How long was the boom? The conveyor? Where was the spud
located? What recovery system did it use, sluices or jigs? Are there
detailed records from the company that ran the dredge? Did they do test
holes? Why did they quit mining? You may not be
able to get hold of the records of the dredging operation, but you can
more easily find out details of the dredge itself. And it helps to know
how bucket line dredges work. HOW BUCKET LINE DREDGES WORK: Bucket line dredges have three main components, the BOOM, the
HULL and the CONVEYOR or CONVEYORS (also called stackers or tail
stackers). The BOOM is like a big chainsaw blade, with buckets instead
of teeth. The BOOM can raise and lower. The buckets are dragged across Dredges did not have a propulsion system. They were moved by
winches secured to anchor points on land, and by the buckets themselves.
The winches moved the dredge both from side to side, to swing the boom,
and forwards or backwards. To keep the dredge from being pushed
backwards when digging, and to provide the pivot points for swinging the
boom, there were one or more SPUDS, or long, stout metal shafts. These
spuds were sunk into the bottom as anchors. With only one spud sunk, the
dredge could pivot from side to side. That is why dredge tails are
crescent-shaped, because the dredge would pivot in a fan-shaped pattern
as it moved up or down the streambed. As the dredge pivoted on the spud,
the CONVEYOR stacking the tails and the boom with the buckets would
pivot as well. Also, some dredges’ conveyors could pivot independently
of the dredge. One result of this pivoting action was that pie-shaped
pieces of untouched ore would remain along the margins of the dredge’s
cut. (See illustration.) Here is a critical point: The tails you see now consist of
material that came from a long way away. Some dredges were up to 300
feet long, from boom tip to end of conveyor, so the tails you see today
might represent rocks that came from 300 feet away! READING THE TAILS: Have a look at the tails. Are they mostly larger rocks, 3
inches and bigger? Or 6 inches and bigger? If there is no undersize
material, you can know that the undersize is down deep, under the larger
rocks that were stacked on top of them. If there is some undersize, you
know that the screening system in the dredge was not washing well, or
that the undersize was de-watered and stacked with the oversize.
The crescent orientation of the tails will also tell you
which direction the dredge was going. Often dredges would work an
especially rich area more than once, going upstream, downstream, and
side to side. If you find a spot where the dredge wasn’t just plowing
upstream, there was probably a reason for it. They were chasing a hot
spot! Another thing that frequently occurred with dredges was that
they would park in one spot, and material would be brought to them from
elsewhere by scrapers or trucks. This would result in particularly tall
stacks, and the pond site where the dredge sat to do this is a good area
to prospect, where all the undersize material was dumped out the back of
the dredge. (If that dredge did not de-water and stack the undersize…)
Sometimes, a dragline would bail the undersized tails material out of
the pond as the dredge was fed. Dragline tails in such an operation look
a lot like dredge tails, but their crescent shape is less pronounced.
Also, their tails would consist of smaller screened materials. If you
can find a stack of these smaller materials, test it! TESTING TAILS: So how do you test tails? Without heavy equipment, it is
difficult. Look for the ponds where the dredge sat, that is a good place
to start, and there will be few large rocks to deal with. In many cases
these old ponds will be dry now, and easy to sink a test hole in. If you
have access to a loader or a dozer, knock a hole through a tail stack.
See if you can get to where the smaller materials are. There will be
little small material where the oversize stacker dropped the oversize. Now that you have found a section of undersize, take a
2-bucket sample. Run it through a sluice or other recovery system. Pan
it out. If you have about 7 good colors (smaller than a #2 pencil lead
size, bigger than flour) in 2 buckets, you may be onto something. 30 to
50 yards of this material might produce an ounce of gold. Obviously,
this is not rich enough for a suction dredge to make money, but a simple
backhoe operation can run about 100 yards a day (if done right), and the
bigger dozer or dragline ops can easily do 1000 yards a day. That would
be 2-3 ounces for a little backhoe op, and 20-30 for the big operation. Now, take 6 more samples from 6 different places. Still
getting the same amount? Or did you find where to dig and where to NOT
dig? If the samples are not consistent, don’t plan on putting a lot of
time into this spot until you have figured out why. Next, examine the gold you got under a powerful magnifying
glass. Is it very thin flakes, easy to lose? Or really fine gold? Is it
the kind of gold your system doesn’t recover well either? Take that
into account! I have heard a number of prospectors say that the bucket
dredge in their area left some or most of the gold. Maybe. If it had a
jig system, probably not. The bottom line is there is only one way to
find out, go dig a BUNCH of test holes. Then get together the money,
time and equipment and mine the tails. Then you will TRULY know how much
was left…. A final aspect of bucket dredges that is very important to us
small miners and prospectors is that they could not work where the
bedrock was shallow. Depending on the bucket dredge and the terrain and
bedrock topography, they often had to stop when bedrock was within a few
feet of the surface. So the margins of dredged ground might still be
unmined, and possibly rich. Also, they can be mined by suction dredges
or backhoes since they are relatively shallow. METAL DETECTORS: Every big
operation it seems has the legend of the worker who watched the pie
plate-sized nugget go out the oversize conveyor, only to be buried
before the machinery could be shut down. Makes a body itch to run a
detector over those tails, doesn’t it? But remember, detectors have
been around for 50 years now. And a nugget that size can be found by the
crudest of detectors! Sure, there might be nuggets in dredge tails, big
ones too, but don’t waste time on the tails that are readily
accessible. You won’t be the first to look there. Scan old maps for
remote dredge sites, even sites now in protected areas. Then check to
see if it is legal to take a detector there. CONCLUSION: So can you make money mining dredge tails? I have been to a
bucket dredge hundreds of miles in the bush of NW Alaska. All materials,
parts, and fuel must be flown in. This is EXPENSIVE! This company was
working a crew of about 12 people, at Alaska wages no less, running an
old bucket dredge in its own tails, i.e. re-running the tails, not even
in new ground! And it was making money. But to make money mining dredge
tails you will almost certainly need a large-scale operation, dozers and
draglines – or a bucket dredge! The margins are the place for the
small miner to look for missed pie-shaped pieces, and the shallower
stuff. And always remember, the fact that someone once spent the huge
amount of money required to get a bucket dredge moved in and set up
proves that there was most likely SOMETHING there! |
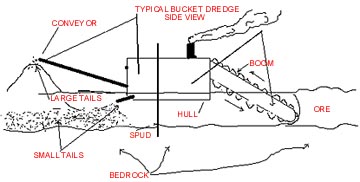 the face of the ore body, or bedrock if they dug that deep, from back to
front. They fill with ore and transfer it into the HULL, where the
material is screened. The oversize material is sent to the CONVEYOR (or
CONVEYORS,
the face of the ore body, or bedrock if they dug that deep, from back to
front. They fill with ore and transfer it into the HULL, where the
material is screened. The oversize material is sent to the CONVEYOR (or
CONVEYORS,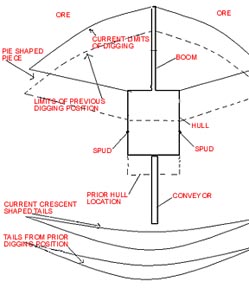 Now
look at those big rocks. Are there lots of really big rounded rocks? If
so, the dredge was in a hot spot, where the heavy, big rocks settled. Is
there a lot of rough, shattered rock, completely unrounded? The dredge
was into bedrock there, and this is important. Dredge operators were
often paid by how far they went, or how much material they processed.
Digging the buckets into bedrock invited a breakdown, broken cables or
buckets, or worse, so operators would only do it when they were in
really hot ground! Or by mistake of course… so look for a large area
of bedrock in the tails to help locate old hot spots.
Now
look at those big rocks. Are there lots of really big rounded rocks? If
so, the dredge was in a hot spot, where the heavy, big rocks settled. Is
there a lot of rough, shattered rock, completely unrounded? The dredge
was into bedrock there, and this is important. Dredge operators were
often paid by how far they went, or how much material they processed.
Digging the buckets into bedrock invited a breakdown, broken cables or
buckets, or worse, so operators would only do it when they were in
really hot ground! Or by mistake of course… so look for a large area
of bedrock in the tails to help locate old hot spots.